User programmable protocol: Receiving messages
To be able to effectively program a SPLat to receive messages via a user programmable protocol, you first need to be very accurately informed about what the external device sends out. You should not only study the documentation on the device, but preferably also connect it to a terminal emulator and actually see the messages displayed on your screen. The terminal function built into SPLat/PC is useful for doing this. It can display received data in ASCII and hex, and allows you to easily generate outgoing messages with a mixture of printable and non-printing characters. It also allows multiple outgoing messages to be stored and sent with a button click. There are also a number of terminal emulators available online, such as RealTerm. Ideally you should try and fully interact with the device manually, and understand exactly what’s happening, before trying to code the interaction into SPLat.
The relevant instructions are those that start with ComRx_ under communications instructions. These allow you to look out for specific “signal” characters, trim out filler characters (like space), and extract decimal or hexadecimal numbers from the receive buffer.
SPLat/PC includes a serial communications simulation window, which is very useful when you are at the stage of single-stepping your program in the SPLat/PC simulator. You can also use the terminal function in SPLat/PC to interact with a program running in the SPLat controller.
Example 1.
This example presumes an external instrument that transmits periodic readings in ASCII. The reading format is simple a number followed by carriage return. A typical message would look like this:
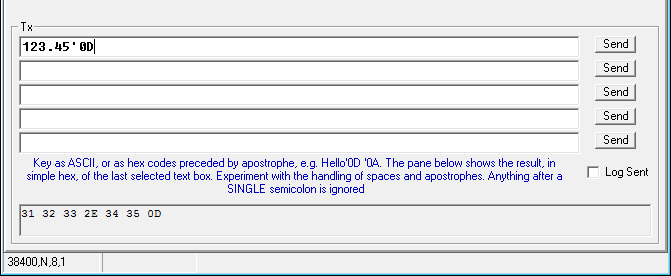
123.45<CR>
when <CR> represents the carriage return character, or '0D. At this point I advise you to go to the SPLat/PC terminal. In the Module window click SIO, in the window that appears select the Terminal tab. This gives you the terminal emulator. The bottom half is dedicated to sending stuff to a connected SPLat controller (or anything else you care to connect serially!). Type in what I typed in the image below, and take special note of the blue help text and what appears in the very bottom section. Play around until you are comfortable with composing messages with printing and non-printing characters. (a letter A is printing, as is a space, while a carriage return is not)
The nice thing about this terminal function is that you can type in a message once and click its Send button many times.
Once you are comfortable with how to send a message to the SPLat, you can proceed with the program below. Translate and send the program to your board, and run it, make sure the Terminal setting are as shown in the lower lefthand corner of the screen shot above. Now try sending numbers terminated in <CR>. (Click here for some tips for working around problems with copy and paste out of Internet Explorer and HTML-help (.chm) files)
;Example of receiving ASCII numbers into the serial port. Designed for MS120, easily adapted to MMi202. ;There is one MultiTrack task per function. OBLCD_Dim 1,8,2 ;Set up LCD backlight for dimming # Open_Serial Port(251) User(38400, 8, N) ;Start up the serial port in "user" protocol. This will delay 10 seconds LaunchTask ReceiveNumbers LaunchTask HeartBeat ;Run indicator LaunchTask CrashMe ;Suicide task RunTasksForever fRxNumb defFLOAT ;The received ReceiveNumbers: ;Wait until there is a CR in the receive buffer YieldTask LoadX '0D ;CR ComRx_FindXInBuf ;X become 255 if NOT found IncX GoIfZ ReceiveNumbers ;Now I have a CR, I know there has to be a number ComRx_fGetNum 255 ;Fetch the number ComRx_ReadOne ;Gobble the CR OBLCD_SetCur 0,0 OBLCD_fDispW 9,3 ;Display the number fStore fRxNumb ;Save it GoTo ReceiveNumbers CrashMe: ;Suicide WaitOnK 16 Die GoSub Die ;Program wil restart at once, but with 10S delay before user comms starts up. HeartBeat: On 8 ;The LED under the kill button Pause 2 Off 8 Pause 20 GoTo HeartBeatExample 2.
This example is more elaborate. A hypothetical device, connected to the SPLat, can send 4 different messages: These are:
ON<CR>
OFF<CR>
W=123.45<CR>
H=78.9<CR>
The first two should result in an output (front panel LED) turning on or off. The last two start with W= or H= and include a variable numeric value, which is to be displayed. The program uses the ComRx_StrFind instruction to identify received text strings via a table of expected strings. ComRx_StrFind is a very powerful instruction, and you should spend a few minutes reading up on it.
;Example of receiving ASCII commands into the serial port. Designed for MS120, easily adapted to MMi202. OBLCD_Dim 1,8,2 ;Set up LCD backlight for dimming # Open_Serial Port(251) User(38400, 8, N) ;Start up the serial port in "user" protocol. This will delay 10 seoonds LaunchTask ReceiveStuff LaunchTask HeartBeat ;Run indicator LaunchTask CrashMe ;Suicide task RunTasksForever ReceiveStuff: ;Wait until there is a CR in the receive buffer, signalling a complete command. YieldTask LoadX '0D ;CR ComRx_FindXInBuf ;X = 255 if NOT found GoIfXEQ 255,ReceiveStuff ;Now I have a CR, I know there has to be something else. NVSetPtr Pointers ;Point to table of string pointers ComRx_StrFind 0 ;Look for a match with the strings stored in NVVEM Push iiPrintText 251,"Got one " ;Diagnostic iiHexPrintX 251 ;Diagnostic iiPrintText 251,'0D,'0A ;Diagnostic Branch ;Test X and branch accordingly Target Nothing Target doON Target doOFF Target doW Target doH DoON: On 11 ;Tuirn on a LED GoTo ReceiveStuff DoOFF: OFF 11 ;Tuirn off a LED GoTo ReceiveStuff DoW: ComRx_fGetNum 255 ;Get the number OBLCD_SetCur 0,0 OBLCD_Text "W=" OBLCD_fDispW 9,3 ComRx_ReadOne ;Flush the terminating CR GoTo ReceiveStuff DoH: ComRx_fGetNum 255 ;Get the number OBLCD_SetCur 1,0 OBLCD_Text "H=" OBLCD_fDispW 9,3 ComRx_ReadOne ;Flush the terminating CR GoTo ReceiveStuff Nothing: ;If no match, flush one character to (hopefully!) expose something we can recognise ComRx_ReadOne ;Waste one character out of RX buffer GoTo ReceiveStuff CrashMe: ;Suicide WaitOnK 16 Die GoSub Die ;Program will restart at once, but with 10S delay before user comms starts up. HeartBeat: On 8 ;The LED under the kill button Pause 2 Off 8 Pause 20 GoTo HeartBeat ********************************************************************** NVEM0 ;NVEM tables ;List of expected "commands". Note they must all terminate in 0 strON: NV0Byte "ON",'0D,0 strOFF: NV0Byte "OFF",'0D,0 strW: NV0Byte "W=",0 strH: NV0Byte "H=",0 ;Pointers into the list of commands Pointers: NV0Ptr strON NV0Ptr strOFF NV0Ptr strW NV0Ptr strH NV0Byte 255 **** Essential terminator **** Experiment with this program, and getting it receiving and acting on inputs from the Terminal window.
I have left in a bit of diagnostic code, which prints out the index number of the string found in the table. Its output appears on the Terminal screen.
Note the code at the program line Nothing: If a received string is not recognised, we throw away one receive character from the head of the buffer. This ensures that, should anything go wrong, the program will eventually recover so long as it is receiving <CR> characters.
Exercises.
- Remove the
ComRx_ReadOneatNothing:, then try sending a bad message like OX instead of ON. What happens? Restore theComRx_ReadOneand try again. - Why have I got <CR> (or
'0D) terminators on the first two strings in the NVEM table, but not for the second 2? Hint: Why do I have ComRx_ReadOne instructions in the segmentsdoW;anddoH:? - Experiment with the
ComRx_StrFindargument. - Merge this example with the one under “User programmable protocol: Sending out messages” to make a program that both receives and decodes stuff and sends stuff out. Get creative, so what is sent out is in response to something received.